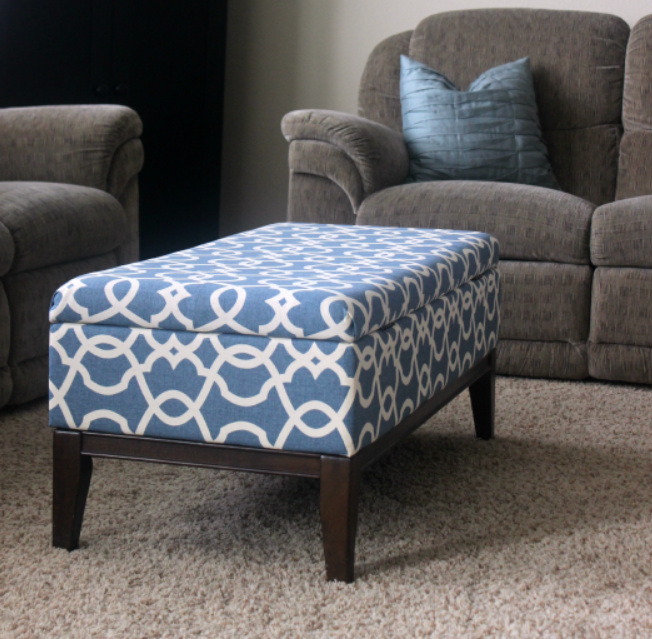
How to Recover a Storage Ottoman: Step-by-Step Guide
If your storage ottoman has seen better days, recovering it could give it a fresh new look. Learning how to recover a storage ottoman is a rewarding DIY project that can save you money and breathe new life into your furniture. Let’s dive into the process and get your ottoman looking great!
To recover a storage ottoman, remove the old fabric, cut new fabric to size, and staple it securely to the ottoman frame. This simple process can make your ottoman look brand new. Follow these steps for a successful DIY recovery project!
Ready to restore your storage ottoman? Read on for detailed instructions, tips, and tools you’ll need to complete the project.
Why Recover a Storage Ottoman?
Over time, storage ottomans can lose their charm. Whether the fabric is torn, faded, or simply out of style, recovering a storage ottoman is a simple and cost-effective way to revamp it. Instead of buying new furniture, you can customize the look to match your decor and extend the life of your ottoman.
Tools and Materials Needed to Recover a Storage Ottoman
Before you start your how to recover a storage ottoman project, you’ll need a few essential tools and materials. Here’s a list to get you started:
New fabric (choose a durable, upholstery-grade fabric)
Staple gun with staples
Scissors
Screwdriver or drill (if needed to remove the top)
Fabric glue (optional for additional security)
Measuring tape
Foam padding (if you’re also replacing the cushioning)
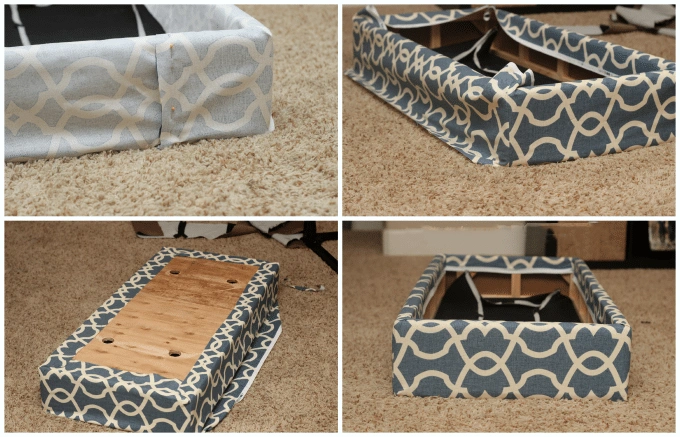
Step-by-Step Guide on How to Recover a Storage Ottoman
1. Remove the Old Fabric
Start by removing any existing fabric. Use a screwdriver or drill to take off the ottoman’s top if it’s removable. If the fabric is attached with staples, use a staple remover to carefully take it off. Take note of how the fabric is attached so you can replicate it with the new material.
2. Measure and Cut the New Fabric
Once the old fabric is removed, measure the dimensions of the ottoman’s frame and cushioning. Cut your new fabric to size, ensuring there’s extra material on each side to wrap around and staple it securely.
3. Attach the New Fabric
Begin stapling the fabric to the ottoman frame, starting from one side and working your way around. Pull the fabric tightly to avoid wrinkles or sagging. Ensure the fabric is stretched evenly as you go, and fold the edges neatly at the corners for a polished look.
4. Add Foam Padding (Optional)
If you’re updating the ottoman’s cushioning, this is the time to add foam padding. Cut the foam to fit the size of the ottoman, then place it over the top or seat area before stapling the new fabric in place. This will make the ottoman more comfortable while adding a fresh layer of padding.
5. Reattach the Ottoman’s Top
Once the fabric is securely attached, reattach the ottoman’s top to the frame. If necessary, tighten any screws or fastenings to make sure the lid fits snugly. You now have a beautifully recovered storage ottoman!

Tips for a Successful Storage Ottoman Recovery
Choose Durable Fabric: Since the ottoman is often used for seating and storage, opt for durable, upholstery-grade fabric that can withstand regular wear.
Use Coordinating Colors: Choose a fabric that matches or complements your room’s decor. Neutral colors like grey, beige, or navy work well for most interiors, but don’t be afraid to get creative with patterns.
Go for a Cushioned Look: Adding a foam layer beneath the fabric can make the ottoman more comfortable for sitting, making it both functional and stylish.
Secure the Corners: Be extra careful when stapling the corners. Neat, tight corners are key to giving your ottoman a professional-looking finish.
Other Ways to Update Your Storage Ottoman
If recovering the ottoman isn’t enough, you can also:
Add Decorative Nailhead Trim: Nailhead trim can add a polished, modern look to the ottoman’s edges.
Paint the Frame: If the frame of your ottoman is wooden, consider painting or staining it to give it a fresh new finish. Choose a color that complements the fabric you’ve chosen.
Add Storage Compartments: For extra functionality, consider installing hidden storage compartments inside the ottoman’s lid. This adds more versatility to your furniture.
Conclusion
Learning how to recover a storage ottoman is a simple yet impactful DIY project that can breathe new life into your old furniture. With a little time and effort, you can transform your ottoman into a beautiful, functional piece that complements your home’s decor. Enjoy your newly updated piece!