How to Assemble a Garment Rack in Simple Steps
A garment rack is an essential piece for organizing clothes, especially if closet space is limited. Knowing how to assemble a garment rack not only saves time but also makes setup easier. Here’s a quick, practical guide to assembling one yourself!
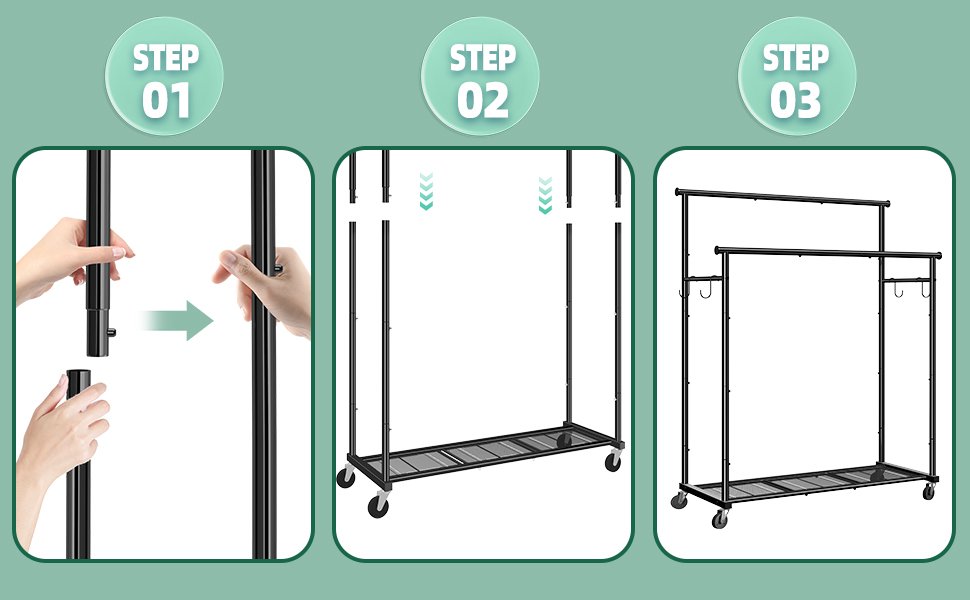
To assemble a garment rack, start by laying out all parts, following the included instructions, and using the recommended tools. Most garment racks follow a straightforward process: attach the base, install the vertical rods, add the crossbars, and finally secure the rack with screws or clips.
Follow this step-by-step guide for assembling your garment rack with ease. Let’s dive in and have your clothes organized in no time!
Step-by-Step Guide
1 Gather Your Tools and Parts
Before starting, ensure you have all parts and tools you’ll need. Garment racks usually come with all required parts, but having a screwdriver or Allen wrench handy is helpful. Check the box for the following:
– Base bars
– Vertical rods
– Crossbars
– Wheels (optional)
– Screws, bolts, or clips
Pro Tip: Lay everything out and organize each part by type to save time later.
2 Assemble the Base
The base provides stability for the entire rack. Most models will have two horizontal bars that connect via crossbars. Here’s how:
1. Align the base bars parallel to each other.
2. Attach crossbars in between the base bars using screws or bolts as provided.
3. If your rack includes wheels, insert them into the base for easy movement.
This is a crucial step for stability, so ensure all screws are tightened.
3 Attach the Vertical Rods
The vertical rods give height to your garment rack. Here’s what to do:
– Insert the rods into the designated spots on the base. Some racks may have a click-and-lock system, while others may require screws to secure them.
– If your rack allows adjustable height, choose your preferred height before tightening.
Having these rods tightly secured prevents the rack from wobbling.
4 Add the Crossbars for Clothing
Most garment racks come with crossbars that act as hanging rods for your clothes. Attach these bars as follows:
1. Place each crossbar at the designated height.
2. Secure with screws, clips, or by sliding the bar into grooves, depending on the model.
Make sure these bars are level and strong enough to support the weight of your clothes.
5 Secure All Parts and Test Stability
Once the primary structure is in place, do a quick stability test by gently pressing down on the rack. If there’s any wobble, re-tighten all screws and check each connection point.
This step helps ensure your rack will support a full load without tipping over.
Conclusion
Assembling a garment rack is a simple DIY project that can make a big difference in organizing your space. By following these steps, you’ll have a sturdy, practical storage solution for your clothes, saving closet space and making everything more accessible. Enjoy your newly organized clothing setup!


